

Fix and Revamp
No needlework skills? No problem. Once you've followed these simple steps, you'll never ask someone else to sew your buttons again.
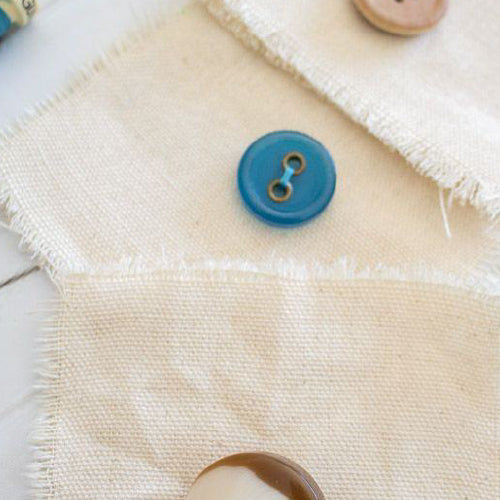
Stitching

You need:
Needle, thread, toothpick or match.
How to:
Step 1: Secure the thread with a knot.
Step 2: Give the button some space using a toothpick or match.
Step 3: Start sewing diagonally through all holes.
Step 4: Remove the toothpick, or match. Done!
Embroidery
Embroidery is a relaxing and rewarding craft that anyone can learn with a little patience and practice. Whether you want to create decorative art or personalize clothing, this guide will walk you through the basics of getting started with embroidery.

1. Gather Your Supplies
Start by assembling the essential tools:
- Embroidery Hoop: Keeps your fabric taut while you stitch
- Needles: Choose embroidery needles with a sharp tip and large eye for threading
- Embroidery Floss: Comes in a variety of colors and is easy to work with
- Fabric: Cotton or linen is ideal for beginners as it’s easy to stitch through
- Scissors: Use small, sharp scissors for cutting thread Marker or Transfer Pen: To draw your design onto the fabric.
2. Prepare Your Fabric
Place your fabric in the embroidery hoop:
- Unscrew the hoop and separate the two rings.
- Place your fabric over the smaller ring.
- Lay the larger ring on top and tighten the screw while pulling the fabric taut.
3 .Transfer Your Design
Draw or trace your design onto the fabric using a washable or disappearing ink marker. You can also use transfer paper to copy designs if you’re working with intricate patterns.

4. Learn Basic Stitches
Start with a few simple embroidery stitches:
- Running Stitch: Perfect for outlines and simple patterns. Bring the needle up through the fabric, then back down in an alternating motion
- Backstitch: For solid lines, bring the needle up ahead of your last stitch, then back down at the end of the previous stitch
- Satin Stitch: Great for filling shapes. Make closely spaced stitches side by side to cover an area
- French Knot: A dds texture. Wrap the floss around the needle, then push it through the fabric close to where you started.
5. Thread Your Needle
Cut a length of embroidery floss ( about 18 inches ) , separate it into 2-3 strands, and thread it through the needle. Tie a small knot at the end to secure it to the fabric.
6. Start Stitching
Follow these tips as you begin Keep your stitches even by pulling the floss gently A void long threads on the back of your work ; secure them with small knots Take breaks to ad j ust the fabric and ensure your design stays aligned.
7. Practice on Simple Projects
Begin with small and manageable designs, like flowers, hearts, or geometric shapes. Gradually work your way up to more complex patterns as you gain confidence.
8. Finish Your Project
When your design is complete:
- Knot the thread on the back to secure it.
- Trim excess thread and remove the fabric from the hoop
- Iron your embroidery to remove wrinkles, being careful not to crush the stitches.

9. Display Your Work
Show off your creation! Y ou can frame your embroidery, stitch it onto clothing, or use it in home d é cor pro j ects like pillowcases or wall hangings .
With these steps, you’ll be stitching like a pro in no time. Remember, embroidery is a skill that improves with practice, so keep experimenting and enjoy the process!
Quilting
Quilting is more than just a craft — it 's a way to tell stories through fabric and thread. Each quilt holds a unique narrative, whether it’s a patchwork of cherished old clothes or a design inspired by a loved one’s favorite colors. Rooted in tradition and passed down through generations, quilting celebrates creativity and community. Modern quilters are now blending traditional techniques with bold, contemporary patterns, ensuring that this timeless craft evolves while staying true to its roots.

Getting started with quilting might seem overwhelming, but it’s easier than you think! Begin with a simple pattern like a basic nine - patch or rail fence, and focus on choosing fabrics that inspire you. Essential tools like a rotary cutter, cutting mat, ruler, and sewing machine will make the process smoother. Start small, such as a baby quilt or a table runner, to build your skills and confidence before diving into more intricate designs.
It offers an incredible variety of styles to explore. From the geometric precision of Amish quilts to the improvisational artistry of modern quilting, there’s something for every taste. Some quilters prefer hand - stitching for its meditative quality, while others embrace the speed of machine quilting. Techniques like appliqué , paper piecing, and free - motion quilting add endless possibilities for customization, allowing every quilter to express their unique vision.
Quilting as Therapy: Stitching for the Soul
For many, quilting is more than a hobby — it’s a form of therapy. The repetitive motion of sewing, the tactile pleasure of working with fabric, and the j oy of seeing a project come together can be incredibly soothing. Quilting provides a creative outlet and a sense of accomplishment, making it a wonderful way to unwind and de - stress. Many quilters also find comfort in quilting groups, where they can connect with like - minded individuals and share their passion.

Quilting is always evolving, and modern trends are bringing fresh energy to the craft. Minimalist designs, bold graphic patterns, and the use of negative space are becoming increasingly popular. Many quilters are also exploring non - traditional materials, such as metallic threads or mixed - media embellishments. Another exciting trend is the rise of “quilt - as - you - go ” techniques, which make quilting more accessible for those with limited time or space.
Preserving Quilt Traditions in a Modern World
While modern quilting is thriving, preserving traditional quilting techniques is e qually important. Heritage quilting styles, such as log cabin, flying geese, and Baltimore Album quilts, connect us to the past and honor the craftsmanship of earlier generations. Organizations and quilting guilds around the world are working to document and teach these techniques, ensuring that the legacy of quilting remains alive for future generations.